
First Wok, Then Flavor
Seasoning a new wok is essential before you start cooking. It builds a natural, non-stick patina – a layer of polymerized oil that improves cooking and adds flavor.
Carbon steel woks are classic for their responsiveness and high heat tolerance. Stainless steel woks resist rust and are easier to maintain but don't develop as deep a patina. Seasoning stainless steel focuses more on preventing sticking than building a traditional layer. The goal for all materials is a protective, non-stick surface.
Seasoning is an ongoing process; each use reinforces the patina. Neglecting it will degrade the non-stick surface. The process is simple, and the rewards of flavorful food and easy cleanup are significant. Understanding how your wok responds is more important than strict rules.
Gather Your Supplies
Gather a high-heat cooking oil, such as peanut oil, which has a high smoke point and neutral flavor. Canola and vegetable oil are alternatives. You'll also need a generous supply of paper towels.
A gas stove is preferred for direct heat, though electric stoves can work with patience. You will need dish soap for the initial cleaning; soap can be used on a new wok before it is seasoned.
A simple wok spatula is helpful but not critical. Focus on having the right oil and plenty of paper towels. Ensure your kitchen is well-ventilated, as the oil will smoke.
The Initial Scrub & Heat
Wash your new wok thoroughly with hot, soapy water to remove manufacturing oils and coatings. Use a scrub brush or non-abrasive sponge. Rinse well and dry completely; remaining water will hinder seasoning.
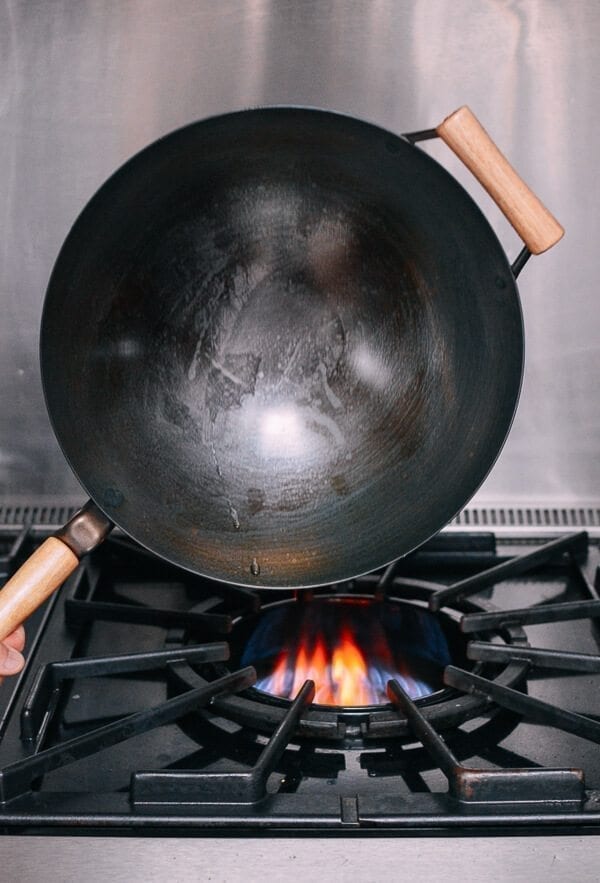
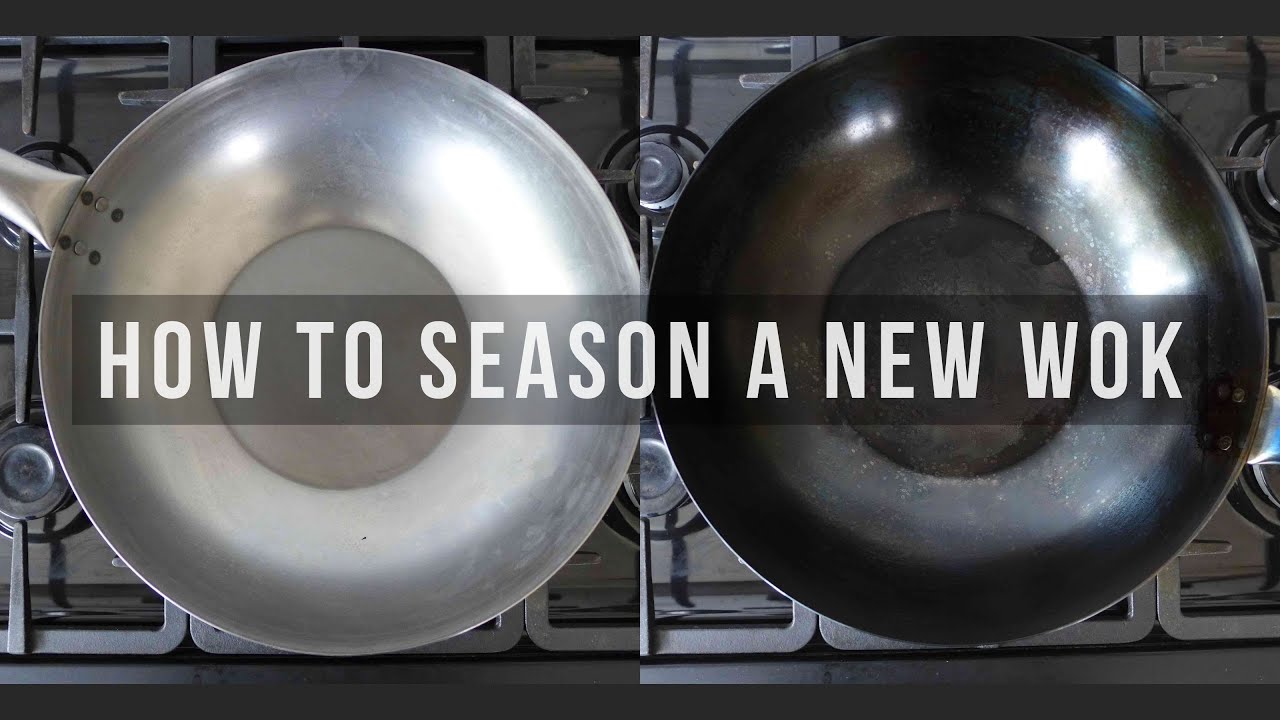
Once dry, place the wok over high heat. You’ll quickly notice the metal starting to change color. This is perfectly normal. It’s the remaining manufacturing oils burning off. You’re looking for a fairly consistent color change across the entire surface – ideally a bronze or golden hue. If you see patches remaining silver or gray, that means those areas haven't been heated sufficiently.
Uneven coloring isn’t necessarily a disaster, but it indicates that the heat distribution isn't even. Try rotating the wok over the burner to ensure all areas are exposed to the flame. If you’re using an electric stove, you might need to move the wok around on the burner. Continue heating until the entire surface has a uniform color. This initial heating is crucial for creating a good base for the seasoning.
Oil Application: The First Layer
Apply 1-2 tablespoons of high-heat oil to the heated wok. Use a folded paper towel to spread the oil thinly and evenly across the entire surface, including the sides. A thin, even coat is essential.
Too much oil creates a sticky mess that won't polymerize properly. Apply a light coating, like lotion. Work quickly as the wok is hot and the oil will smoke. Continue heating until the oil smokes visibly.
Let the oil smoke for a few minutes – this is the polymerization process starting. Then, using fresh, clean paper towels, wipe away all excess oil. You want the wok to look almost dry. Repeat this process – oil application, heating until smoking, wiping away excess – 3-5 times. You’ll notice the wok darkening slightly with each layer. Knowing when you’ve applied enough oil comes with practice, but a good rule of thumb is if it looks dry after wiping, you’re on the right track.
Building the Patina: Repeat & Refine
Now comes the patient part – building the patina. Repeat the oiling and heating process multiple times. The more layers you apply, the more durable and non-stick the seasoning will become. Each layer builds on the previous one, creating that beautiful, dark, and protective coating. Don't rush this process; it takes time and effort.
The wok will gradually darken with each layer. You’ll start to see a smooth, almost metallic sheen developing. As you continue, you might encounter some common issues. Patchy seasoning can be addressed by focusing on those areas with extra oil and heat. Sticky spots usually indicate too much oil was used – try wiping them down more thoroughly and reheating. If you notice flaking, it means the oil hasn’t fully polymerized; continue the heating process.
Maintaining the patina is just as important as building it. After each use, gently clean the wok with hot water and a soft sponge. Avoid harsh detergents or abrasive scrubbers. Dry the wok thoroughly and apply a very light coat of oil. This will prevent rust and keep the patina in good condition. It’s not a "set it and forget it" situation; ongoing maintenance is key. I find a quick wipe down with oil after every use keeps things in top shape.
Don’t be discouraged if your initial attempts aren’t perfect. Seasoning a wok is a learning process. Every wok is different, and it takes time to understand how yours responds. Keep practicing, and you’ll eventually develop a beautiful, well-seasoned wok that will last for years.
Cooking Your First Meals
Finally, the moment you’ve been waiting for – cooking your first meals! To continue building the patina, start with dishes that use a generous amount of oil, like stir-fries. This will help reinforce the seasoning. Think about classic dishes like beef and broccoli, chicken with peanuts, or shrimp lo mein. These are all excellent choices for the first few meals.
Initially, avoid cooking highly acidic foods like tomatoes or dishes with a lot of lemon juice. The acidity can strip away the seasoning, undoing some of your hard work. Once the patina is well established, you can experiment with more acidic ingredients, but start slowly. A little bit of vinegar is usually fine, but avoid long-simmering tomato sauces at first.
After cooking, clean the wok gently with hot water and a soft sponge. Avoid harsh detergents. Dry the wok thoroughly and apply a very light coat of oil. I often recommend making a simple stir-fry with garlic and ginger as the very first meal. It adds flavor to the wok and continues the seasoning process.
Troubleshooting Common Issues
Let's address some common problems you might encounter. Rust spots? These usually appear if the wok wasn’t dried thoroughly after washing. Scrub them away with steel wool, then re-season the affected area. Uneven seasoning? Focus on the lighter areas with extra oil and heat. Sticky residue? You likely used too much oil – try wiping it down more thoroughly and reheating.
If you accidentally damage the seasoning – perhaps by using a harsh abrasive – don’t panic. It’s not the end of the world. You can simply re-season the wok from scratch. Start by scrubbing away the damaged seasoning, then follow the steps outlined earlier. It’s a bit of work, but it’s worth it.
If the patina is completely gone, you’ll need to completely re-season the wok. This involves stripping it down to bare metal and starting the oiling and heating process all over again. It’s a more involved process, but it can bring a neglected wok back to life. Remember, patience is key throughout the entire process. A well-seasoned wok is a rewarding investment.
Wok Material Differences
Carbon steel is the traditional choice for woks, and for good reason. It heats up quickly and evenly, responds well to temperature changes, and develops a beautiful, durable patina. However, it’s also prone to rust if not properly maintained. Stainless steel woks, on the other hand, are much more resistant to rust and require less maintenance.
The seasoning process for stainless steel differs slightly. Because stainless steel is less porous than carbon steel, it doesn’t develop the same depth of patina. Instead, the goal is to create a barrier that prevents food from sticking. This involves applying multiple thin layers of oil and heating the wok until the oil polymerizes, forming a smooth, non-stick surface. While it won’t be quite the same as a carbon steel patina, it can still provide excellent cooking performance.
Cast iron woks are also available, but they are much heavier than carbon steel or stainless steel woks and take longer to heat up. They require similar seasoning techniques to carbon steel, but can be more prone to cracking if not heated gradually. Ultimately, the best wok material depends on your individual needs and preferences.
Wok Material Comparison for Seasoning & Cooking
| Material | Reactivity with Food | Heating & Responsiveness | Maintenance Effort | Best Suited For |
|---|---|---|---|---|
| Carbon Steel | High – develops patina with seasoning, impacting flavor | Very Fast & Responsive – heats quickly and evenly | Moderate – requires regular seasoning to prevent rust | High-heat stir-frying, general wok cooking, developing a traditional wok hei |
| Stainless Steel | Low – non-reactive surface, minimal flavor impact | Moderate – heats more slowly and less evenly than carbon steel | Low – relatively easy to clean, doesn't require seasoning | Everyday cooking, sauces, steaming, dishes where flavor impact from the wok is unwanted |
| Cast Iron | Moderate – can react with acidic foods if seasoning is compromised | Slow & Steady – retains heat exceptionally well | High – prone to rust, requires thorough seasoning and maintenance | Searing, deep-frying, slow cooking; benefits from consistent use to maintain seasoning |
| Carbon Steel (with Magnetic Base) | High – develops patina with seasoning | Very Fast & Responsive – compatible with induction cooktops | Moderate – requires regular seasoning, but magnetic base adds durability | Induction cooking, high-heat stir-frying, versatility across cooktops |
| Stainless Steel (Clad) | Low – non-reactive | Improved over standard stainless steel, but still slower than carbon steel | Low to Moderate – easier to clean than carbon steel, but may require more effort than standard stainless steel | Versatile cooking, even heating for sauces and delicate dishes |
Qualitative comparison based on the article research brief. Confirm current product details in the official docs before making implementation choices.


No comments yet. Be the first to share your thoughts!